Partner Portal Guide: Add Account
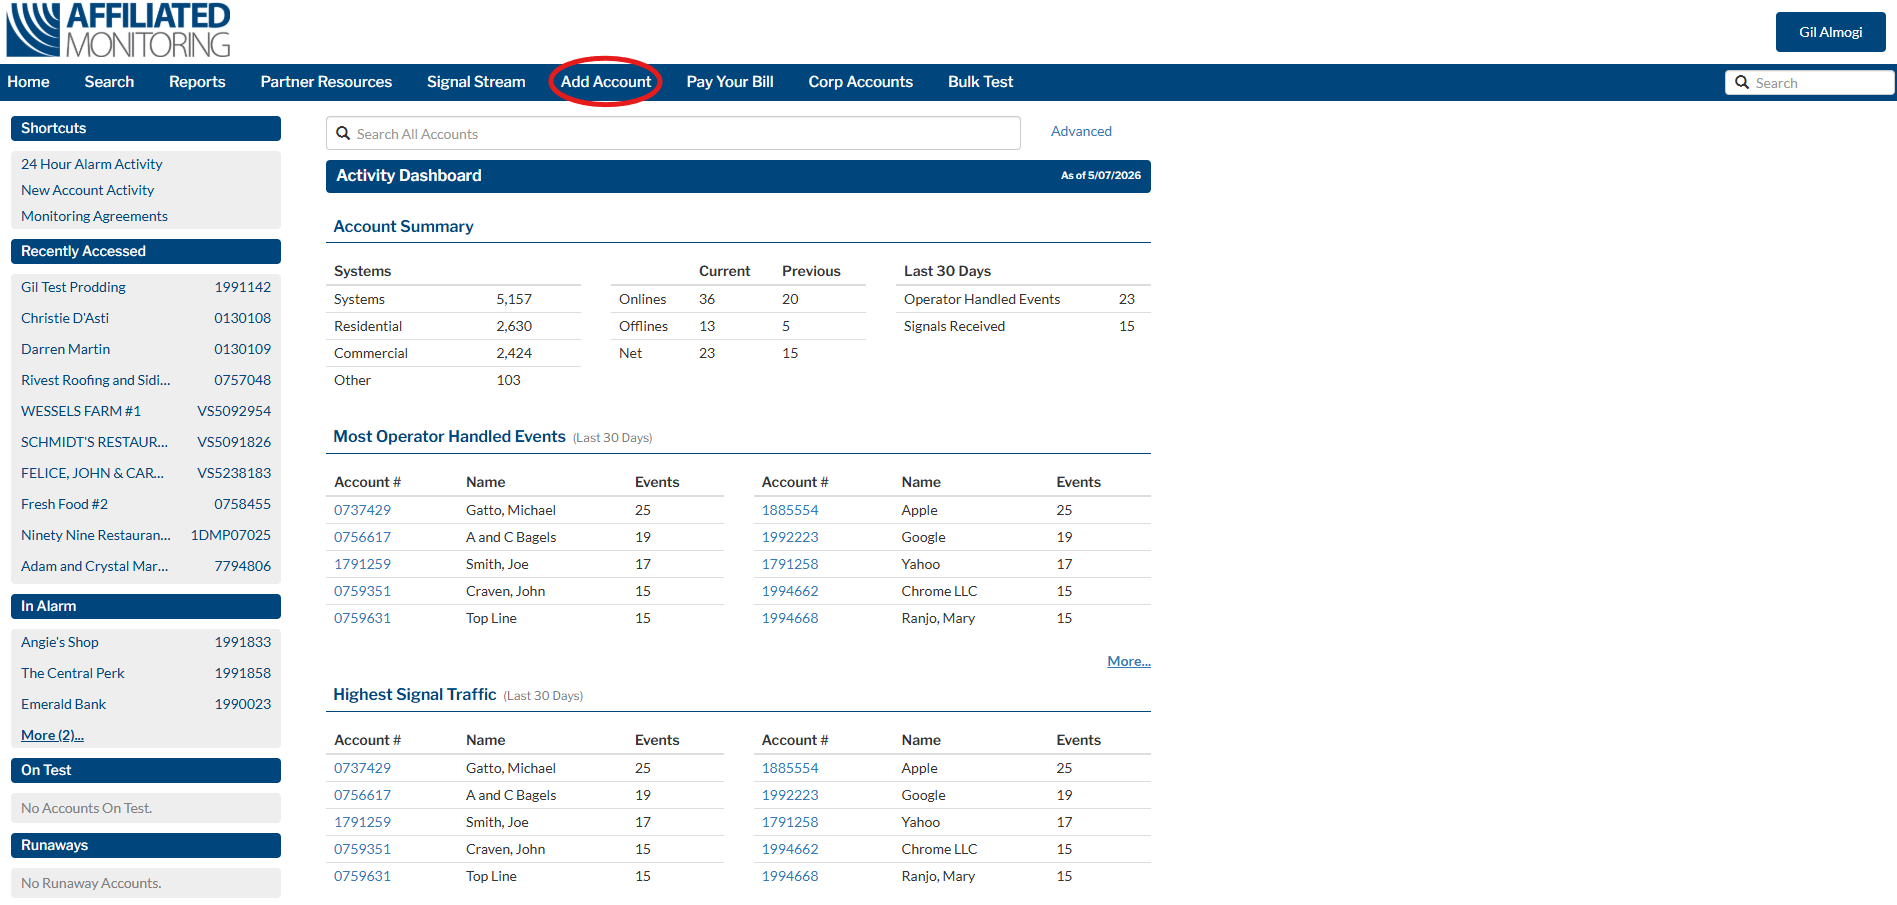
Getting a new account monitored through the Partner Portal has never been easier with our Add Account feature. From the Partner Portal Homepage, click the Add Account button on the top right of the screen.
Site Information
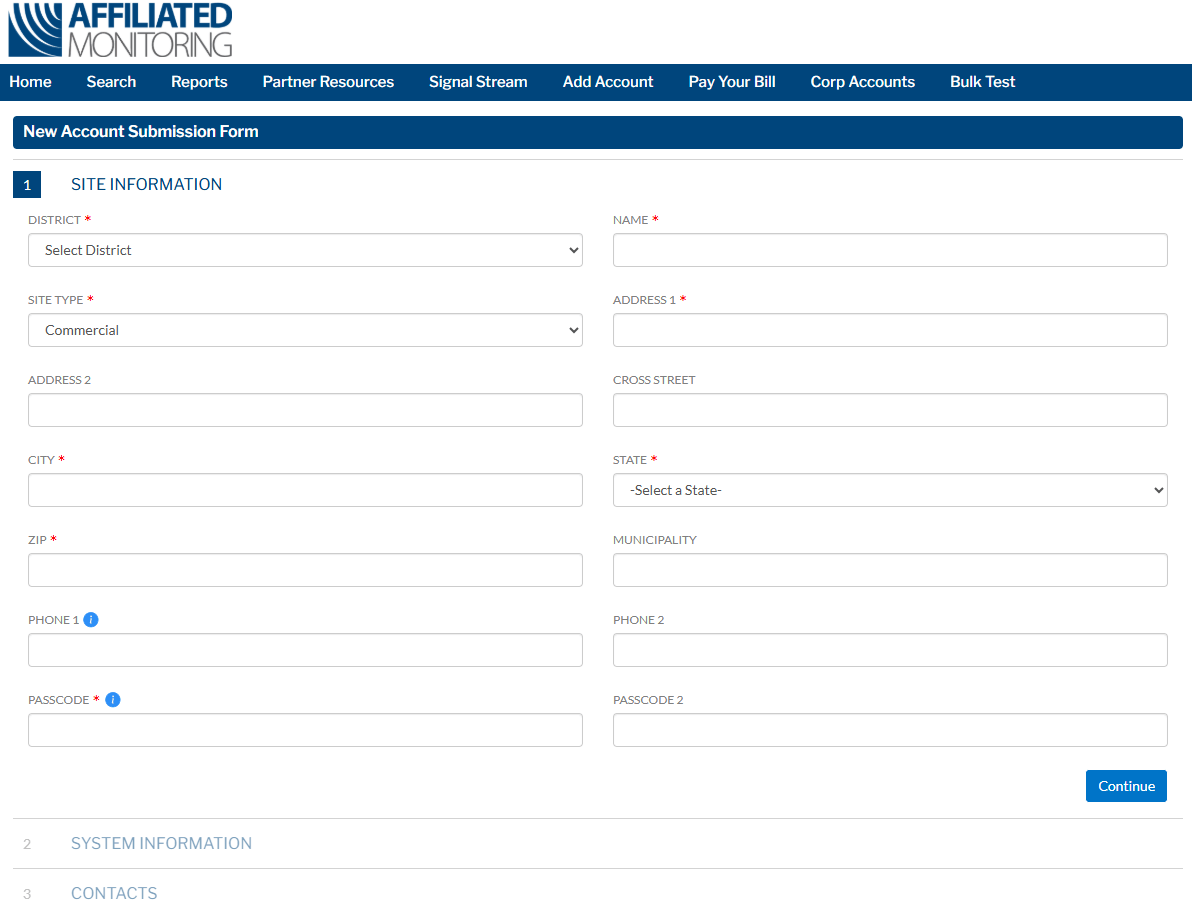
From here you will add the following information(* indicates a required field):
- District*
Use this to choose the District associated with the account you’re placing online. Other names you might use for this are branch, Partner number, Dealer number, or sub-dealer.
If you only have one option, it will be selected for you, and there will be no drop-down menu to change it.

- Name*
This is the name of the location and/or persons we are monitoring. In the case where we are monitoring a residential location the name listed here must be the same as the signature on the Alarm Monitoring Agreement. In the case of a business, the person who is signing must be an officer or a person that has the authority to sign a legal agreement on behalf of the company. The name should be entered as Last Name, First Name. - Location Type*
This field indicates the type of location that is being monitored. (Ex. Residential, Commercial, PERS etc.) - Address, City, State and Zip*
This is the address of the site that is being monitored. - Cross Street
This can be critical information and is sometimes required by the authorities in order to find a location. - Municipality
This can be critical information and is sometimes required by the authorities in order to find a location. (Borough/County, Township, etc.) - Phone 1/Phone 2
These are the phone numbers we are going to call to verify an alarm before dispatching. We recommend providing multiple phone numbers for Enhanced Call Verification (ECV). This will help to reduce false dispatches. - Passcode*/Passcode 2
This is a word or number that the customer must have to verify and cancel an alarm or to get information about their account. The Site Passcode can be shared. If an individual password is desired, this will be set up under the Contacts section of the portal. See Partner Portal Guide: Contacts for further instruction.
Once all required information has been completely entered, click Continue.
System Information
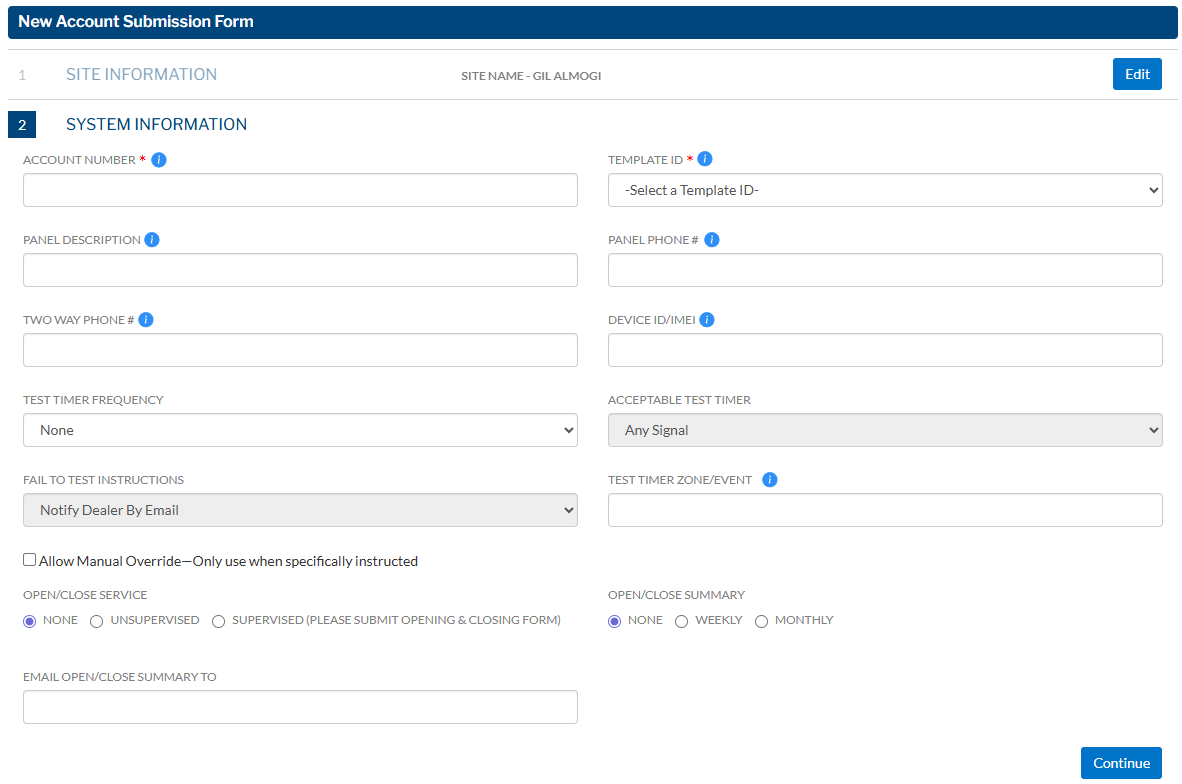
From here you will add the following information(* indicates a required field):
- Account Number*
This is the number that identifies a particular customer and is also known as a Signal Number or Console Number. In most cases the first three digits are the receiver and group/line number and the last four are the number that is programmed into the control panel for that specific customer. Please keep in mind that some communication technologies (i.e. AlarmNet, two-way voice) require a specific receiver and account number.After you enter in an account number, the Portal validates that it is an out-of-service shelled account for your company. If you receive an Error Message, please check to make sure your account has been properly set up.
Note: Finding an available account to put online is easy. Open the Search page. Then, under Search By Account Information, enter your dealer number in the Name field, choose Out of Service at the bottom, and click Search. If you’d like to find available accounts in a specific prefix, enter the prefix in the Account # field. - Template ID*
A template is a default set of alarm handling instructions. Typically this is based upon the signal format and/or site type. A template provides an easy way to ensure that your company’s standard alarm handling procedures are being adhered to across your entire account base. If you already have a template created you will see it at the top of the Template ID drop down list. If you do not have a custom template and wish to have one created, please contact Account Management. - Panel Description
This is a brief description of the panel at the site. This will assist both your service technician and our monitoring specialists in interpreting the signals transmitted. - Panel Phone #
This reflects the caller ID of the alarm system. Please enter the phone number if known. When left blank, the Panel Phone field will be populated by the caller ID of the first signal received. When a value is provided, it will not be overwritten unless someone does so manually or the field is empty the next time a signal is received. - Two Way Phone #
If Two Way Voice Communication is being used, please provide the phone number of the device. The following are examples of some of the devices that require a Two Way Voice phone number:Elevators
Alarm.com Two Way
Numera
LifeBeacon
EZ Care
Essence
iHelp
Brighton Sky - Device ID/IMEI
This field indicates the Device ID or IMEI of the communicator being used. - Test Timer Frequency
Indicate at what interval the communicator will transmit a test timer signal (ex. Daily, Weekly or Monthly).Clicking the checkbox, “Allow Manual Override”, will allow you to enter a non-standard amount of hours by selecting Other from the drop-down menu.
Only use this checkbox when specifically instructed. A Partner Support Specialist can assist you with entering the correct option.
- Acceptable Test Timer
This indicates if Affiliated should accept any signal as confirmation that the panel is communicating properly or if we should only accept a Test Timer signal. - Fail to Test Instructions
This indicates the response we will take when a Test Timer is not received.Clicking the checkbox, “Allow Manual Override”, will allow you to enter a non-standard set of fail to test instructions by selecting Other from the drop-down menu. If you choose Other, you will be required to enter an Event ID in order to submit your settings.
Only use this checkbox when specifically instructed. Entering the wrong values here may result in notifications being made improperly or not being made at all. A Partner Support Specialist can assist you with entering the correct options.
- Test Timer Zone/Event
You must indicate the test timer reporting code in this section. - Open/Close Service
Indicate if this account has Opening/Closing Service. If the Open and Close signals are to be Supervised, please fill out an Opening/Closing form available on the Partner Resources page of the Partner Portal. - Open/Close Summary
Please indicate the frequency at which you would like Open/Close reports sent to either you or the customer. - Email Open/Close Summary To
Indicate what email address(es) the Open/Close Summary Report is supposed to go.
Once all required information has been completely entered, click Continue.
Contacts
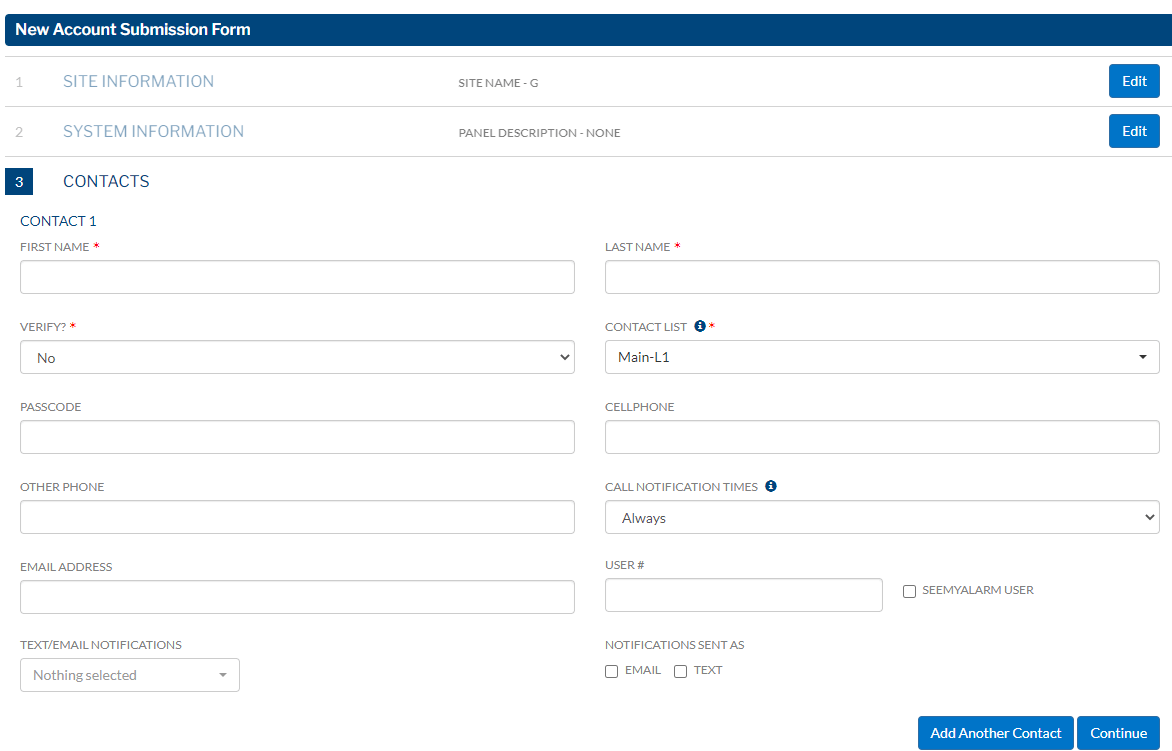
From here you will add the following information(* indicates a required field):
- First and Last Name of Contact*
- Verify?*
Please advise if we are to notify this contact before dispatching.Note: In accordance with NFPA 72, a verification call is not made prior to dispatch on Commercial Fire alarms without written authorization from the local authority having jurisdiction (AHJ). - Contact List*
Please select whether the contact should be on the Main-L1 contact list (default, known as Call After Dispatch), the Secondary-L2 list, or None.Note: When selecting a contact list, please ensure that the proper template and/or global instruction has been applied to the account. - Passcode
Indicate if this contact would like their own individual passcode. This passcode must differ from the General Passcode listed on the Site Information Page. - Cellphone⁄Other Phone*
Please provide the phone numbers that should be called during the notification process.Note: It is recommended that cell phone numbers are provided as they are the most effective way to reach your customers. - Call Notification Times
Indicate if the contact should only be contacted during specific time frames. This option defaults to Always. If you select Only or Except, you will be prompted to provide days, start, and end times for the notification time window. - Email Address
If the contact would like to be emailed in addition to or in lieu of a phone call or text, please provide their email address in this section. You can designate what signals they are to be emailed on, similar to the text message notification in the Text/Email Notifications section of the Contacts.Note: For text/email notification, please ensure that the proper event code has been noted on the zones page or indicated on your template. The event code should start with a ‘Y’ or have ‘SE’ in the description. - User #
If the location has Open/Close Service, please indicate what User Number this contact was assigned. This will allow you to see the identity of the person who is opening or closing the location in the Event History on the Partner Portal. - SeeMyAlarm User
Check this box if this contact should have access to the SeeMyAlarm subscriber app.Note: For any questions about SeeMyAlarm, please reach out to Partner Support. - Text/Email Notifications
If this contact would like a text message, here you can specify what signals they are to be text messaged or emailed on (Ex. Emergency signals only, Trouble, Supervisory or All). - Notifications Sent As
Check the box corresponding to whether the contact should receive Email and/or Text notifications.
If you have additional contacts click the Add Another Contact button. Once your contact information has been completely entered, click Continue.
Agencies
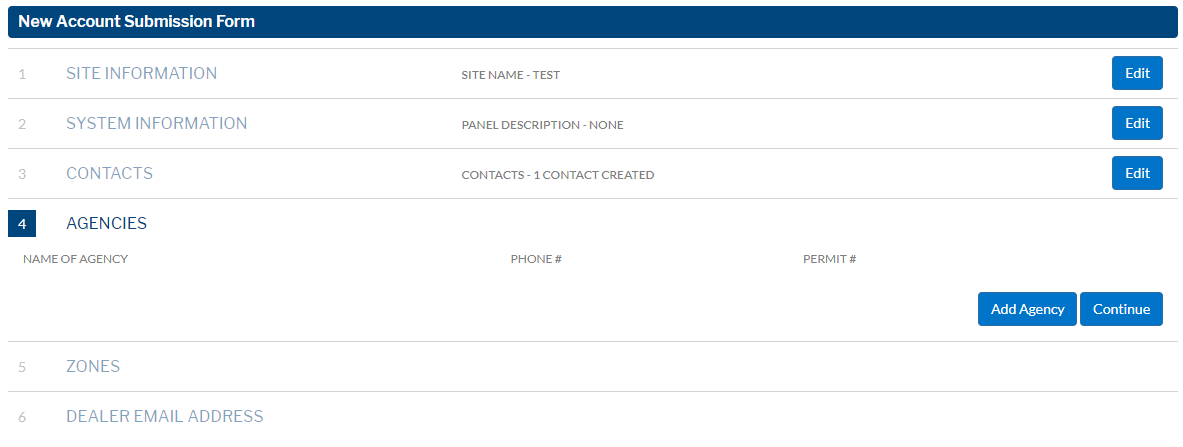
This section is not required, and if left blank, Affiliated’s PSAP lookup system will match the appropriate agencies with this site by address within 20 minutes of the account being placed online. However, if this site, for some reason, requires a specific agency, you may proceed with entry as follows.
Click Add Agency and enter the appropriate name and phone number of each agency desired. Verify with the premises or local authority that the phone number supplied is the correct number to call when dispatching alarms. Many agencies have specific numbers for monitoring centers to call that differ from their general emergency phone numbers. You do not need to enter all agencies unless desired.
Click Continue when done.
Zones
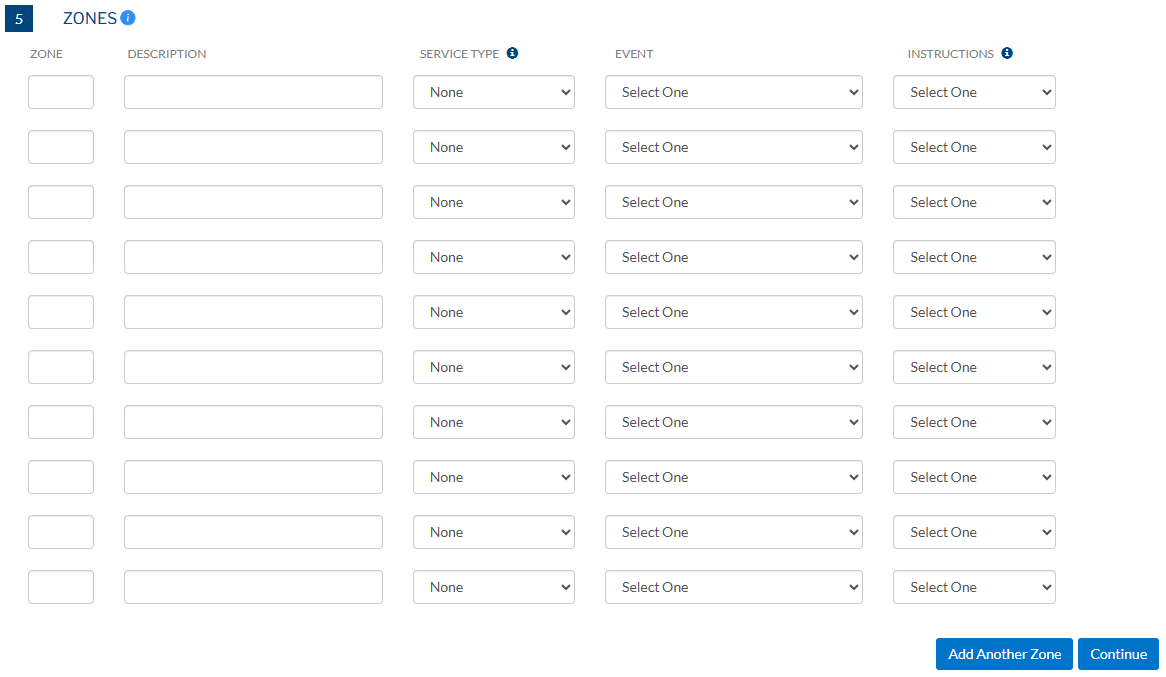
Enter the zones associated with this system. For further assistance with entering zones, please view Partner Portal Guide: Zones.
Submission

Before submitting your new account, you will be presented with the option to submit it In or Out of Service. If you submit it In Service, it will become a live monitored account immediately. If you submit it Out of Service, you will be able to come back to the account another time and activate it when you are ready. For more information on activating an account from the account’s page, please view Partner Portal Guide: Site & System Information.
Click Continue and then Submit.