Partner Portal Guide: Zones
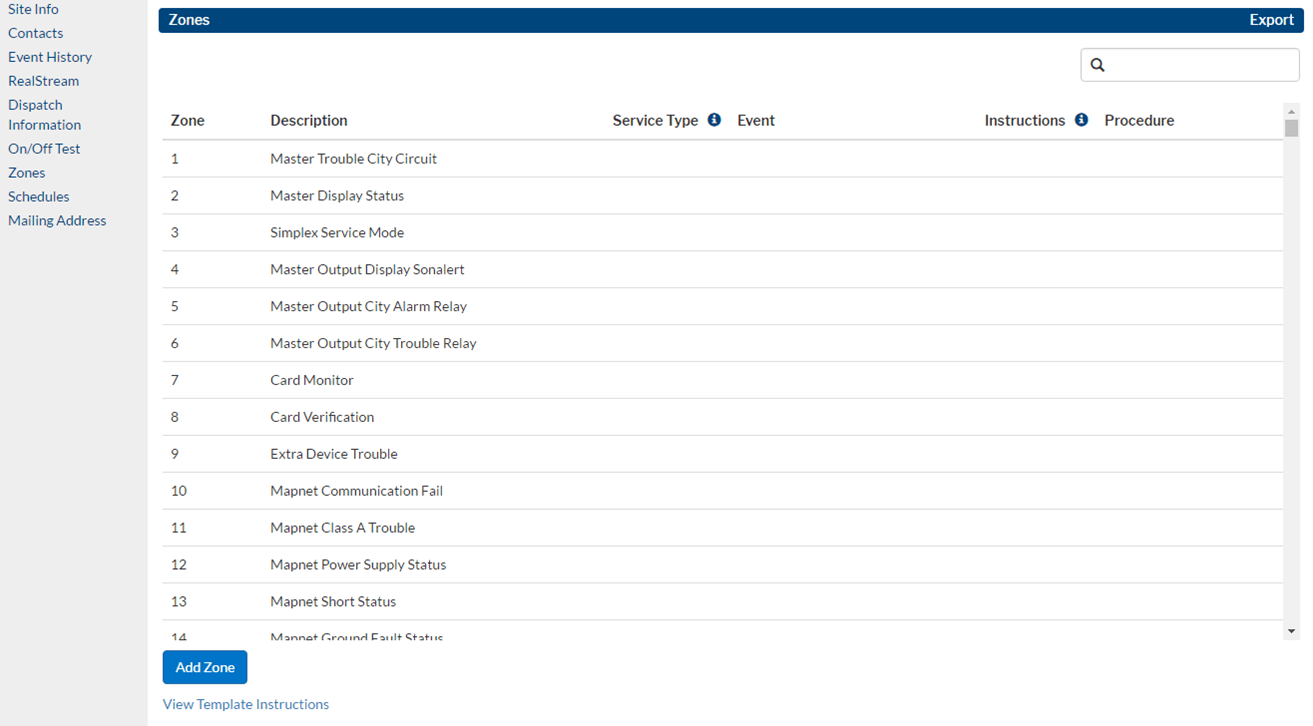
Simple Zone Entry
If you are utilizing a standard alarm communication format like Contact ID, SIA or DMP and the desired instructions match your template, you can simply enter a zone point and description. The Service Type, Event and Instruction fields are not required in this case. Our system will interpret the event code that is being received and match the instructions indicated on the template. These instructions are visible by clicking the ‘View Template Instructions’ link under the Add Zone button.
See example of the Simple Zone Entry below:
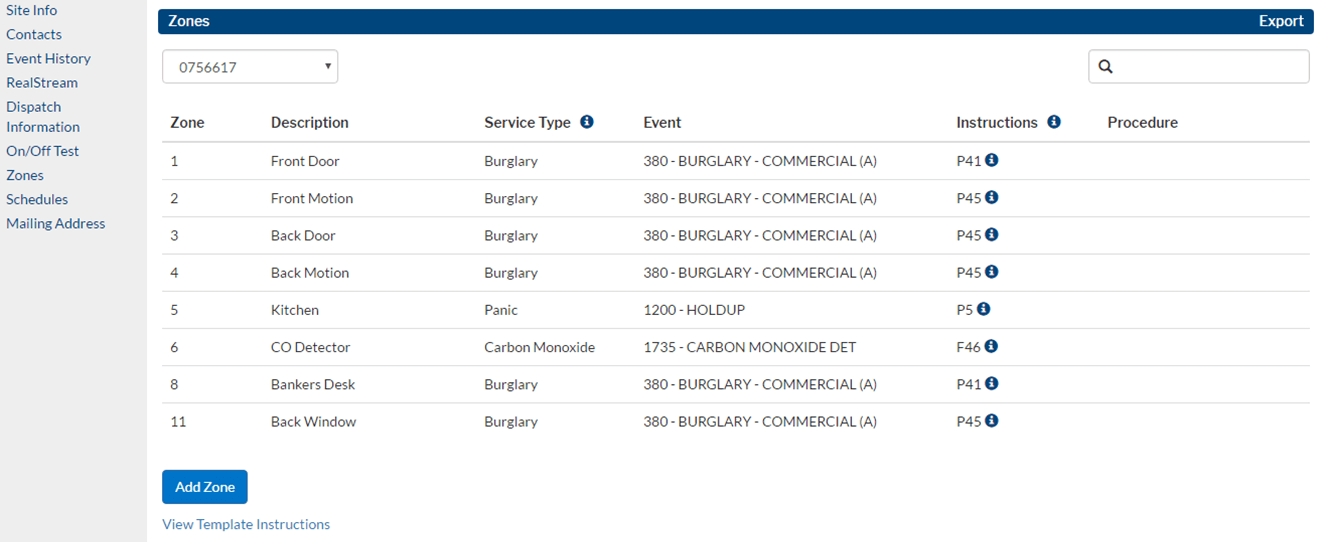
Complex Zones Entry
If you are overriding an event (e.g. using Contact ID event E140 or SIA event BA as a Fire), overriding the template instructions, or using a user defined alarm communication format like 4×2 or 3×1, you must enter a Zone, Description, Service Type, Event and Instruction.
See example of Complex Zone Entry below:
- Zone (Reporting Code)
Enter each zone or reporting code exactly how it will be transmitted to our receivers. The information entered here is critical, as it determines which signals will be responded to.The zone or point enables the panel to identify the origin of the alarm signal. For example, a panel can be programmed to designate point 3 as a motion detector. The points assigned to a site are determined by the system type, or panel, and how the installer programs it. You can assign as many points as necessary.
Note: Reporting codes or signals that are not defined will only be logged to the account’s history. - Description
Enter a description for each zone or reporting code. This information assists your service technicians, the customer/subscriber, the dispatched authorities, and our monitoring specialists in determining the type and location of the alarm. - Service Type
Select the Service Type for each zone or reporting code. Service types are related to a particular type of alarm such as Fire, Burglary, Medical, or Panic and dictate the available Events and Instructions that can be applied. - Event
Select the corresponding Event that you would like to be applied to the zone or reporting code. The available Events will be based upon what Service Type is selected. You may notice there are variations of the events, i.e. 380 – BURGLARY – COMMERCIAL (A) vs. Y380 – BURGLARY – COMMERCIAL (SE-A). If you choose the event starting with Y this will allow our system to send automatic email/text notifications. If you choose the normal event without the Y, no texts or emails will be triggered by the system.The event code determines the type of alarm signal generated if a zone is tripped. For example, if a zone is monitored for burglary, then an event code corresponding to Burglary is entered in the Event field. If the zone is tripped, an alarm is generated, and the dispatch operator receives the Burglary signal.
- Instructions
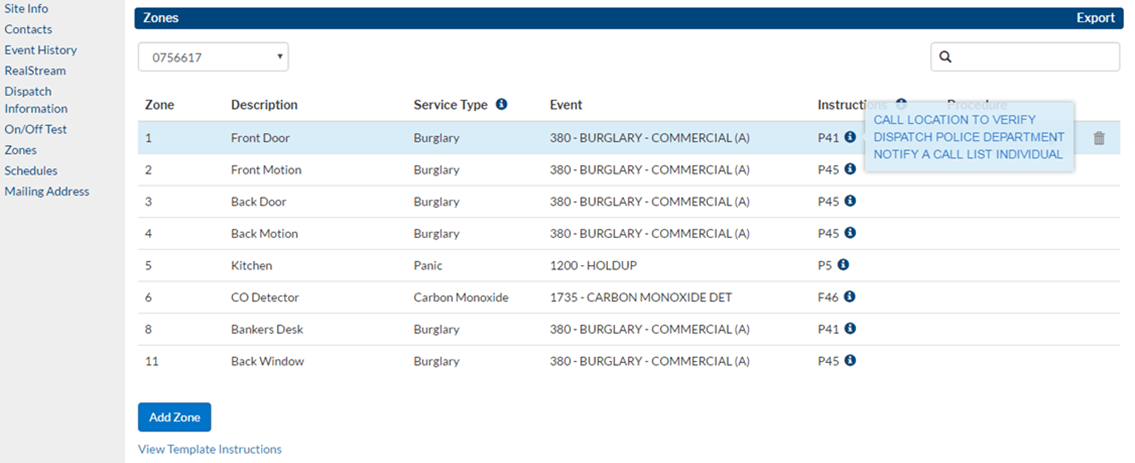
There are many predefined Instructions that you can choose from based upon the Service Type and Event you have selected. These instructions dictate how our monitoring specialists will handle the signal and are abbreviated in the dropdown menu. For example a P41-LOC,PD,L1 instruction means that we will call the location/verification phone number(s), dispatch the Police Department and notify the main call list.See the key below for an explanation of the common abbreviations used:
LOC – Premises/Verify Numbers
L1 – Main Call List
L2 – Secondary call list
L4 – Verify list
PD – Police Department
FD – Fire Department
MD – EMS
INEMF – Email Dealer
PT – Patrol
2WAY – Speak on 2-way
UL – For UL accounts
Runner – for UL accounts
NoVerify – Do not verify passcode
Additionally, once an Instruction has been selected, you can hover over the Information Icon to see a full explanation of the selected Instruction. See example below:
Advanced Zone Input
Users with the appropriate permissions enabled have access to Advanced Zone Input. When creating a new zone or editing an existing zone, click on the plus sign (+) to view Advanced Zone Input.
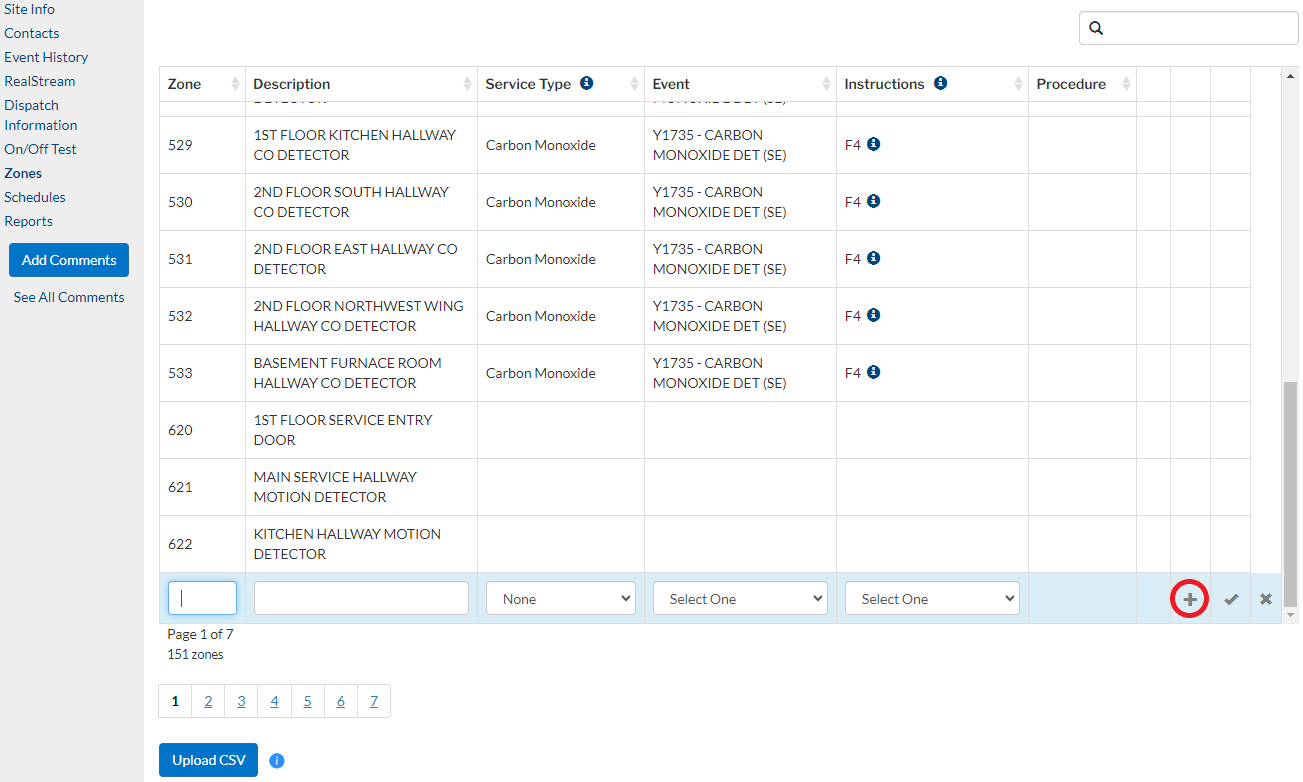
This dialog allows users with even more complex signal routing setups to adjust a greater range of zone settings more freely.
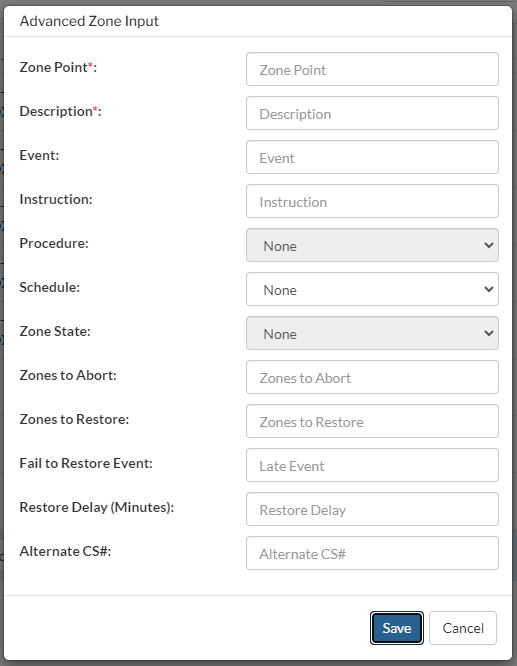
- Zone Point
This is the same as Zone (Reporting Code) above. - Description
This is the same as Description above. - Event
Use this field to enter an existing event code from the Affiliated database. - Instruction
Use this field to enter an existing global dispatch instruction code from the Affiliated database. - Procedure
If your site has any procedures to override alarm handling instructions, they will be displayed in this drop-down menu to select from. Please be careful to choose a procedure that is appropriate for the zone and event. - Schedule
Choose an option from this drop-down menu to attach a schedule to the zone. This is most used to attach Open and Close zones to the corresponding schedule when there are multiple schedules for one system. - Zone State
Use this field to differentiate the distinct types of events from the same zone. For example:Zone 1, State A: Fire Alarm
Zone 1, State T: Trouble on zone 1
Zone 1, State R: Restore for Zone 1This field may automatically change its value depending on whether or not an Event or Instruction has been entered.
- Zones to Abort
Use this field on an Alarm or Trouble zone when a specific zone is required to fulfill the abort criteria. Enter the zone that will fulfill the abort criteria on the Alarm or Trouble zone. - Zones to Restore
Use this field when you need to be notified that a zone has not restored like a Fire System. Enter which zones will be restored on the Restore Zone only. To be as accurate as possible enter “|z,|t” to account for a combination of the zone and the event type. - Fail to Restore Event
Use this field to specify a late event when processing the late restore event for the zone. This should be entered on the Alarm or Trouble Zone only. - Restore Delay (Minutes)
Use this field if you want the Fail to Restore notifications to be made within a specified number of minutes after the alarm is cleared. The system default is 24 hours, so anything other than 24 hours would need to be entered here in minutes on the Alarm or Trouble Zone only. - Alternate CS
Enter the alternate central station number of a site. The alternate CS# serves to pinpoint the location of an alarm signal originating from one of a group of sites. For example, a shopping mall owner can provide a mall with Fire monitoring, and the entire mall would be assigned one CS#. However, each renter in the strip mall can opt to monitor for Burglary; each store would then be assigned an alternate CS# in addition to the CS# assigned by the mall owner. If a zone is tripped, the CS# for the entire mall is sent to the central station; however, the alternate CS# assigned to a zone pinpoints the specific store at which the burglary occurred.
When submitting your zone changes, the zone will save. If there are any issues with values you entered, the Portal will flag them for you in red. However, it is still possible and easy to make mistakes. Use caution or consult Partner Support or Business Care for assistance.
Import Zones
The Zones pages allows you to import a Comma-Separated Values (CSV) file of zone information by clicking the Upload CSV button. This feature is intended to make it easier to enter long zone lists, but it does require some familiarity with our event and instruction codes. Please consult your Business Care Manager or Partner Support if you have questions about how to use this tool properly.
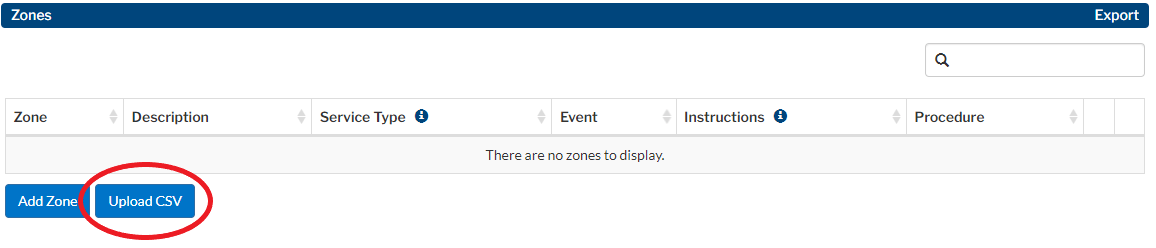
Clicking on Upload CSV will open a file picker, allowing you to navigate to the desired folder on your computer and select a CSV file.
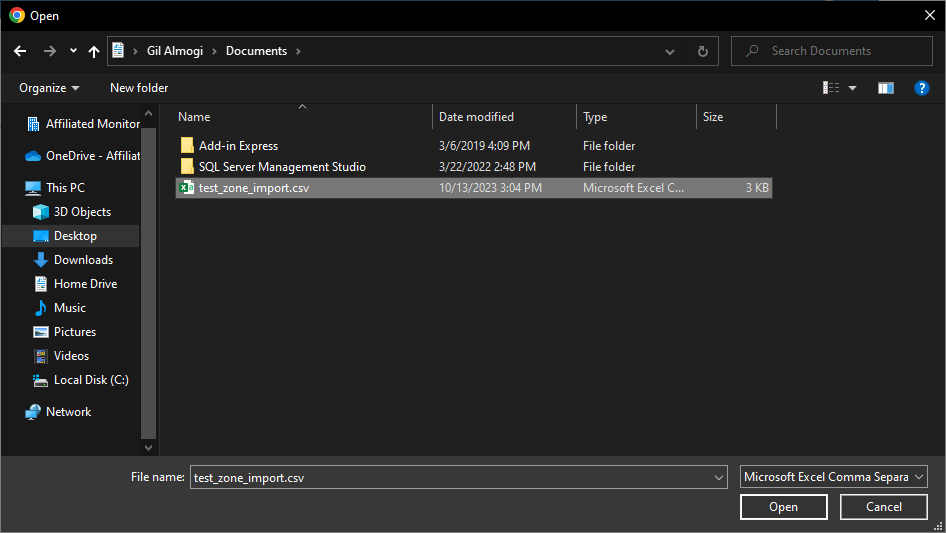
You may only upload CSV files for the zone import function. If you try to upload a different file type, you will receive an error.

In order to use the zone import tool, your CSV file must follow the proper format. It may contain the following columns with the headers. Columns marked with an asterisk (*) are required.
- zone_id* (6 characters max) – This is the zone number, reporting code, or point and corresponds with the Zone column on the Zones page. Some special characters may be permitted, but keep in mind that special characters impact how the zone is processed by our automation software.
- description* (50 characters max) – This is also sometimes referred to as the zone comment and corresponds with the Description column.
- event_id (6 characters max) – This corresponds with the Event column. The value provided for this column must just be a short code representing the event. For example, if the Portal displays “380 – BURGLARY – COMMERCIAL (A)” for one of your zones, you only need to enter 380 in the event_id column.
- disp_id (6 characters max) – This corresponds with the Instructions column. The value provided for this column must just be a short code representing the instructions, such as P45.
Download a sample CSV file here. For more tips about formatting your data and using this feature, see Zone Import Tips below.
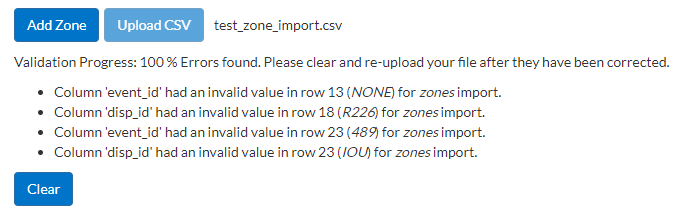
After you have selected a CSV file, the Portal will automatically begin validating that the information is prepared correctly for import.
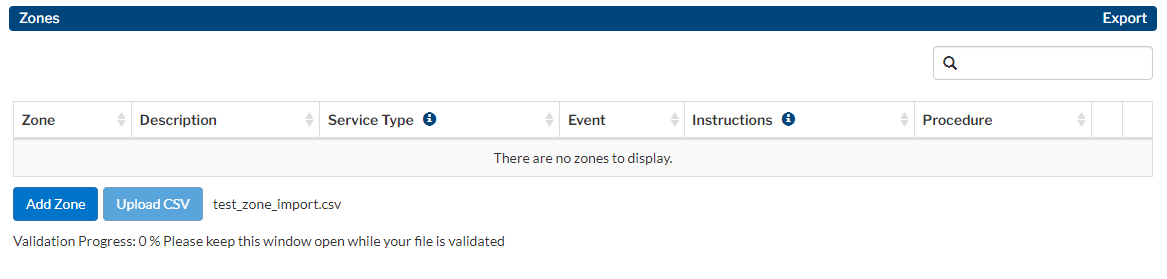
If your data has any errors, they will be listed when validation is complete. You will need to update your CSV file, click Clear, and upload your file once again in order to proceed.
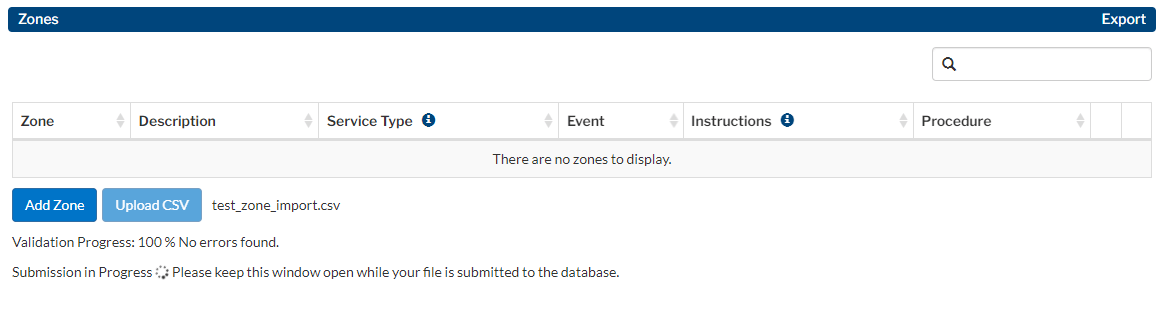
Assuming no errors are found, the Portal will move onto submission of the data to our database. The time it takes for the Portal to complete both validation and submission is variable based on the number and complexity of zones being imported. For example, it takes less time to import 100 zones than 1,000 zones, and it takes less time to import 100 zones with just zone_id and description values than 100 zones will all four columns filled out.
Once submission is complete, the Portal will advise you to refresh the page to view the uploaded zones. You may also close the window if you do not wish to review the updates.
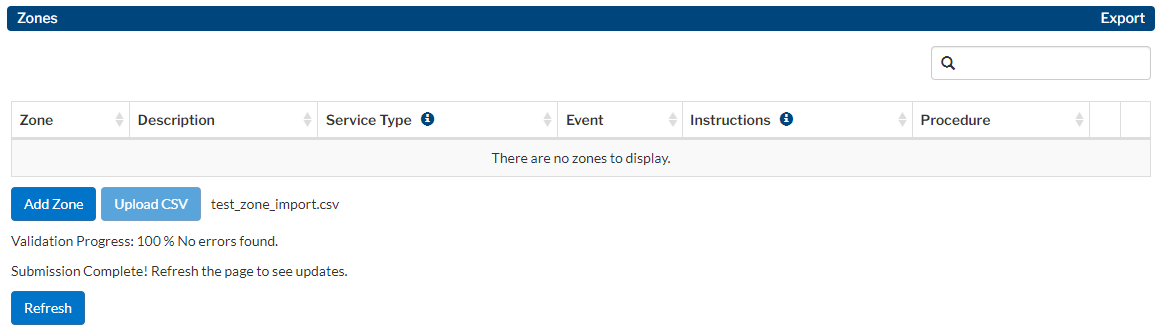
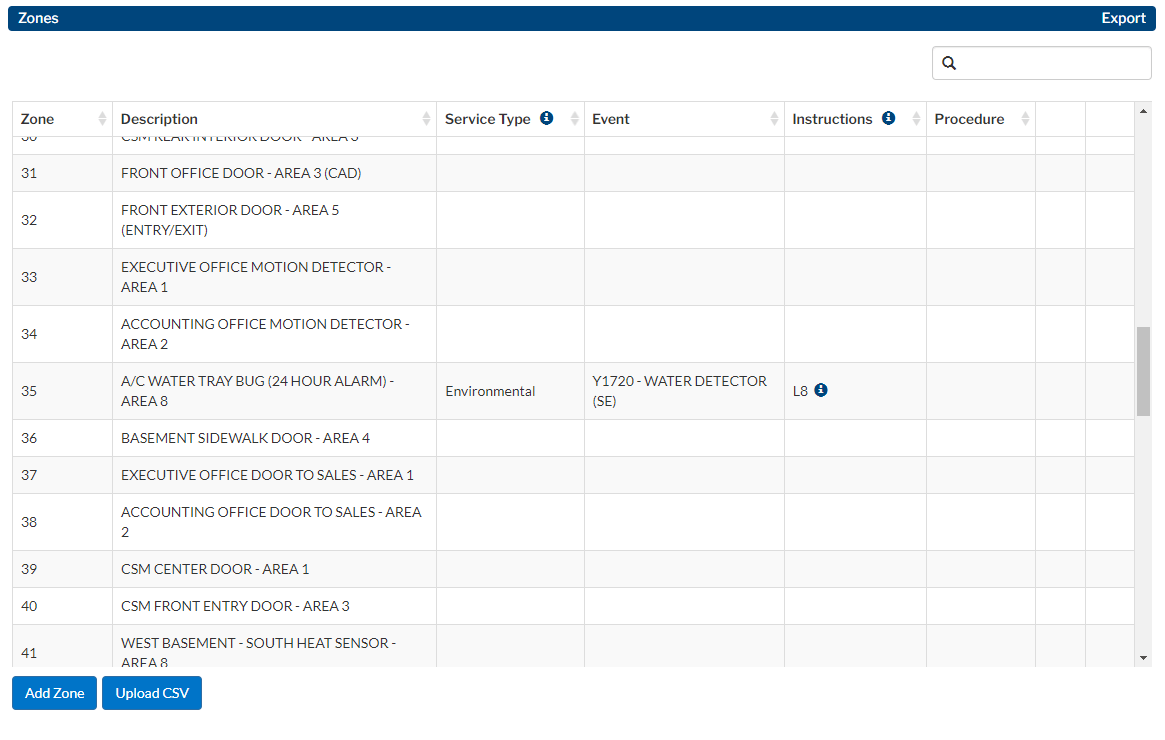
Refreshing the page will display the zones as you are accustomed to seeing them on the Zones page. You may proceed using this page as normal, or you may perform another upload.
Zone Import Tips
Here are some additional tips for using this feature and formatting your CSV:
- The zone import feature can be used to upload new zones or update existing zones. If you have many zones, this could be invaluable for performing updates. Leave out any zones you want left alone.
- If your system has multiple reporting areas, you may easily include zones in those areas by writing the zone_id in the following format: [area].[point] (e.g. 1.2 represents Area 1 Point 2.)
- When viewing the zones for one among multiple systems linked to a single site, uploading a CSV will only impact the zones on that system.
- The zone import feature does not restrict you to event_id or disp_id values that you can select in the Portal when adding or editing a zone. If your company has been advised to use a specific event or instruction not available in the Portal, you may include that in your CSV.
- If you would like to delete the value in Event or Instructions for specific zones, submit those zones with the zone_id and description filled in but no value in event_id or disp_id. Alternately, you may submit NULL instead of a blank. Uploading a CSV without these two columns will also have the same effect. You cannot delete a zone with this feature.
- Microsoft Excel or Google Sheets are the best tools for creating and updating CSVs easily. However, you may run into challenges when trying to enter numerical values which begin with zero for any column. (e.g. zone 04) To get around this, change the format for the cell or the column to Text before typing in a value like this. Note that if you close and reopen the CSV, Excel or Sheets may automatically convert the value back to a regular number and remove the zero.
- CSV files may also be created and updated in Notepad or a similar plain text editor. This also gets around the issue regarding numerical values beginning with zero.
- Regardless of what program you use to create your CSV, it must only contain UTF-8 characters. The easiest way to ensure it does is to save it in UTF-8 format or encoding. In cases where your original data contained invalid characters, this process may change them to new characters. Please review your updated file before uploading. The most common reason your file may contain non-UTF-8 characters is because you copied and pasted or converted from a PDF into a CSV in Excel, in which case, additional spaces sometimes get added to cell values.
- CSV files must not contain any extra data besides the zones you are updating. Do not include extra columns or rows of data unless specifically instructed by someone from Affiliated.
- You cannot upload the CSV generated from using the Export feature on the Zones page. The formatting is incorrect for this feature.
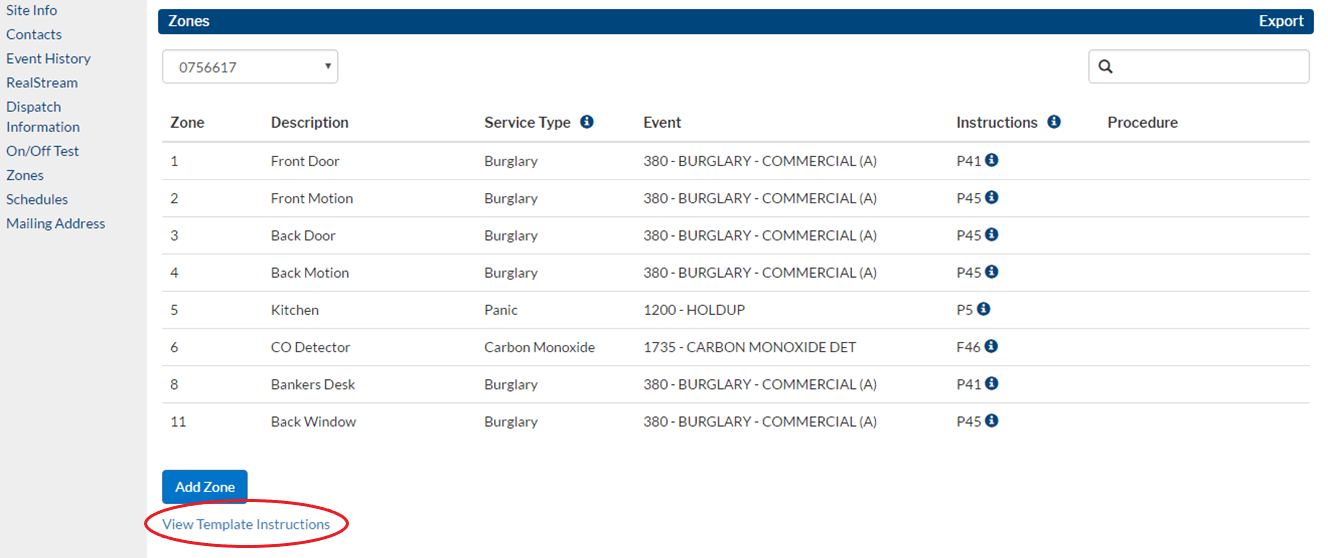
View Template Instructions
Under the Add Zone button you will see a link to view the template instructions. From here you can see the Event Codes that are on the template for this account as well as what instructions will be followed when using the Simple Zone Entry Method.
Export
When viewing the zone list or the template instructions, you may click the Export link in the upper right-hand corner at any time to download a CSV file of what you see on the screen. As noted above, this file cannot be uploaded as part of the zone import feature.