Partner Portal Guide: Reports
The Reports section of the Partner Portal gives you the ability to create, edit, and manage custom reports of your own. These features can be found by clicking “Report” in the navigation header at the top of the portal.
One Click Reports
These are predefined reports that will run without you having to enter in any criteria. The results of these reports will be displayed on screen so you can take further action. Each report can be exported as a CSV file.
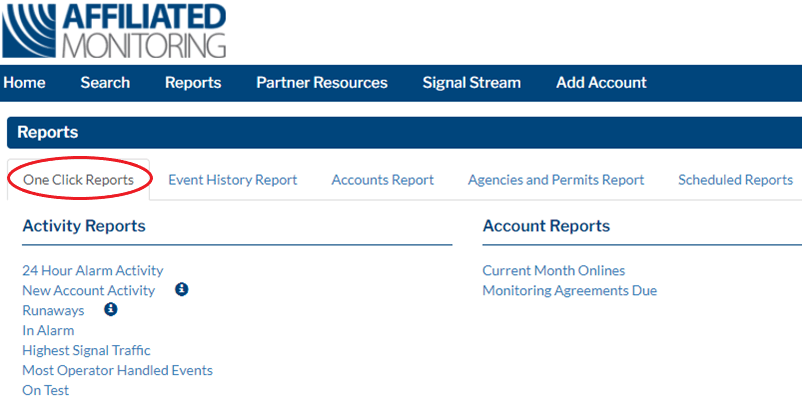
- 24 Hour Alarm ActivityAll Alarm Activity on all accounts from the past 24 hours. You may filter the results by Service Type one the information is displayed.
- New Account Activity
Alarm Activity displayed for any new accounts added within the last 30 days. - Runaways
This is a list of accounts that have been in a Runaway state within the last 24 hours each time it has done so. You may also filter by longer periods of time. - In Alarm
Any Active Account in the Alarm State at the present moment. - Highest Signal Traffic
The top 100 accounts with the highest signal traffic within the last 30 days. - Most Operator Handled Events
The top 100 accounts with the most operator handled events within the last 30 days. - On Test
Any Account that is currently On Test at the present moment. From this page you can extend or clear any current test. - Current Month Onlines
All accounts placed online in the present month. - Monitoring Agreements Due
This report lists the outstanding Monitoring Agreements that have not yet been received by Affiliated. If not received within the 30 day period, a charge will be applied to this account until the contract is received.
Event History Reports
Event History Reports allow you to view an event history summary of your accounts based on specific reporting criteria.
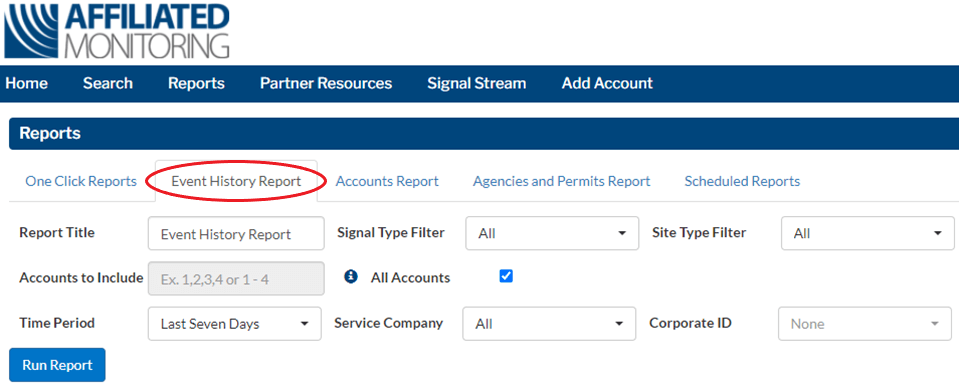
From here you will enter in the following information:
- Report Title
The name you are giving the report you are running. By default it will show ‘Event History Report’. - Signal Type Filter
Choose what Service Types you want the report to show. Ex. Burglary Alarm, Fire, Personal Emergency, Trouble - Site Type Filter
Choose what Site Types you want the report to show. Ex. Commercial, Commercial Fire, Residential, etc. - Accounts to Include
You can uncheck the ‘All Accounts’ box and enter in the account numbers. If you just want to view the history for one account, enter in the account number. For a series of accounts, separate them with a comma. (Ex. 1,2,3,4) For a range, separate them with spaces and a hyphen. (Ex. 1 – 4) You may also do a combination of the two. (Ex. 1,2,3 – 6) - Time Period
Select the Time Frame that you want the report to show. It automatically defaults to select the last seven days but you can go all the way back to when the account was first placed online by selecting Custom and entering in a specific date and time range. - Service Company
If you have multiple dealer numbers associated with your Partner Portal login, you can filter by the specific Service Company. - Corporate ID
If you have a group of accounts that use a Corporate ID you can filter for those with this option.
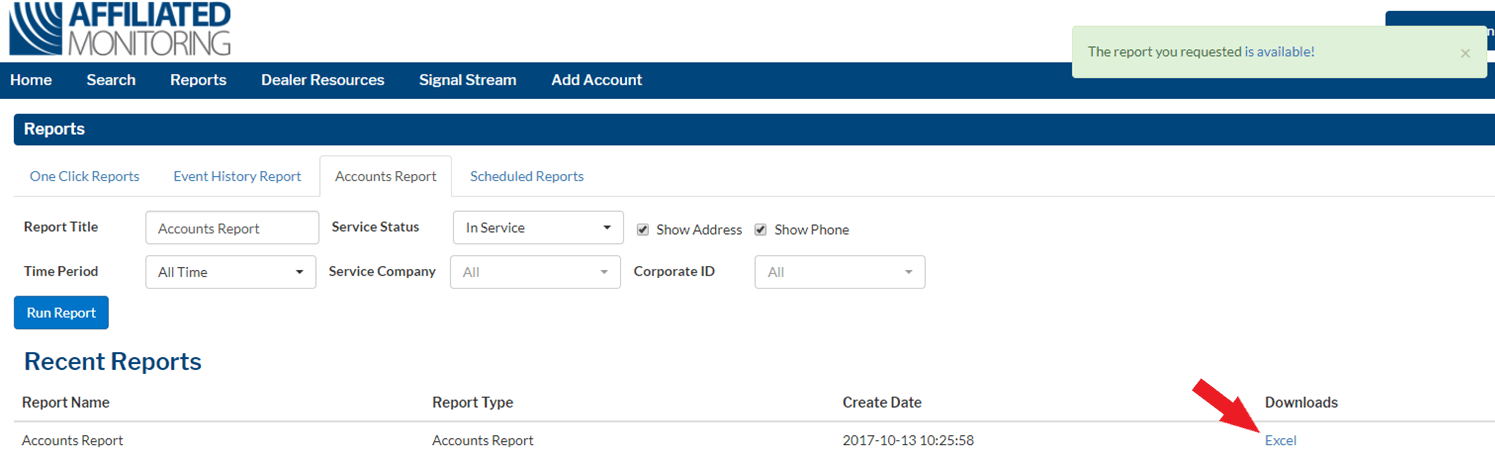
Click Run Report. A green banner will pop up informing you that your requested report is now available. You can click the word available to take you back to the reports to view. Under recent reports, you can select to download the reports as either a PDF or CSV.

Accounts Report
Account Summary Reports allow you to view a summary of your accounts based on specific reporting criteria. This report will include the following information:
| CS Number | Site Name | Address 1/2 | City |
| State | Zip Code | Time Zone | Phone 1/2 |
| Site Type | System Type | Description | Status |
| Active Date | OOS Date | Test Timer Frequency |
Device ID |
| Device # | Dealer Name | Corp ID | Corporate Name |
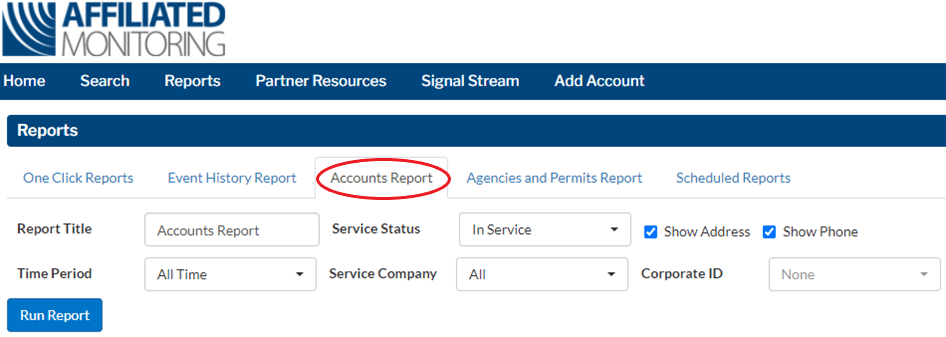
From here you will enter in the following information:
- Report Title
The name you are giving the report you are running. By default it will show ‘Accounts Report’. - Service Status
Choose if you want to view In Service or Out of Service Accounts. You can also select both. - Show Address
The default setting is to show the account addresses in the report. Uncheck the box if you do not require the address. - Show Phone
The default setting is to show the account phone number in the report. Uncheck the box if you do not require the phone number. - Time Period
This will allow you to select what accounts will show by the Active Date. The default setting is for All Time. - Service Company
If you have multiple dealer numbers associated with your Partner Portal login, you can filter by the specific Service Company. - Corporate ID
If you have a group of accounts that use a Corporate ID you can filter for those with this option.
Click Run Report. A green banner will pop up informing you that your requested report is now available. You can click the word available to take you back to the reports to view. Under recent reports, you can select to download the report as an Excel spreadsheet.
Agencies and Permits Report
Agencies and Permits Reports allow you to view a summary of your accounts and their listed agencies and respective permits based on specific reporting criteria. This report will include the the same information as the Accounts Report and additional columns for Agency Type, Agency Name, Agency Phones, Permit Number, and Permit Effective and Expiration Dates.
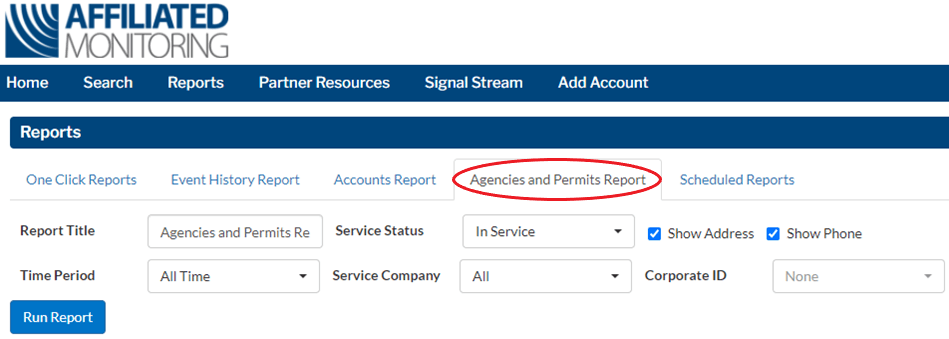
From here you will enter in the following information:
- Report Title
The name you are giving the report you are running. By default it will show ‘Accounts Report’. - Service Status
Choose if you want to view In Service or Out of Service Accounts. You can also select both. - Show Address
The default setting is to show the account addresses in the report. Uncheck the box if you do not require the address. - Show Phone
The default setting is to show the account phone number in the report. Uncheck the box if you do not require the phone number. - Time Period
This will allow you to select what accounts will show by the Active Date. The default setting is for All Time. - Service Company
If you have multiple dealer numbers associated with your Partner Portal login, you can filter by the specific Service Company. - Corporate ID
If you have a group of accounts that use a Corporate ID you can filter for those with this option.
Click Run Report. A green banner will pop up informing you that your requested report is now available. You can click the word available to take you back to the reports to view. Under recent reports, you can select to download the report as an Excel spreadsheet.
Scheduled Reports
Scheduled Report will allow you to schedule an Event History Report at certain frequencies (Ex. Daily, Weekly, Monthly). These reports can be sent to company employees or your customers via email.
Click the Add Report button to begin.

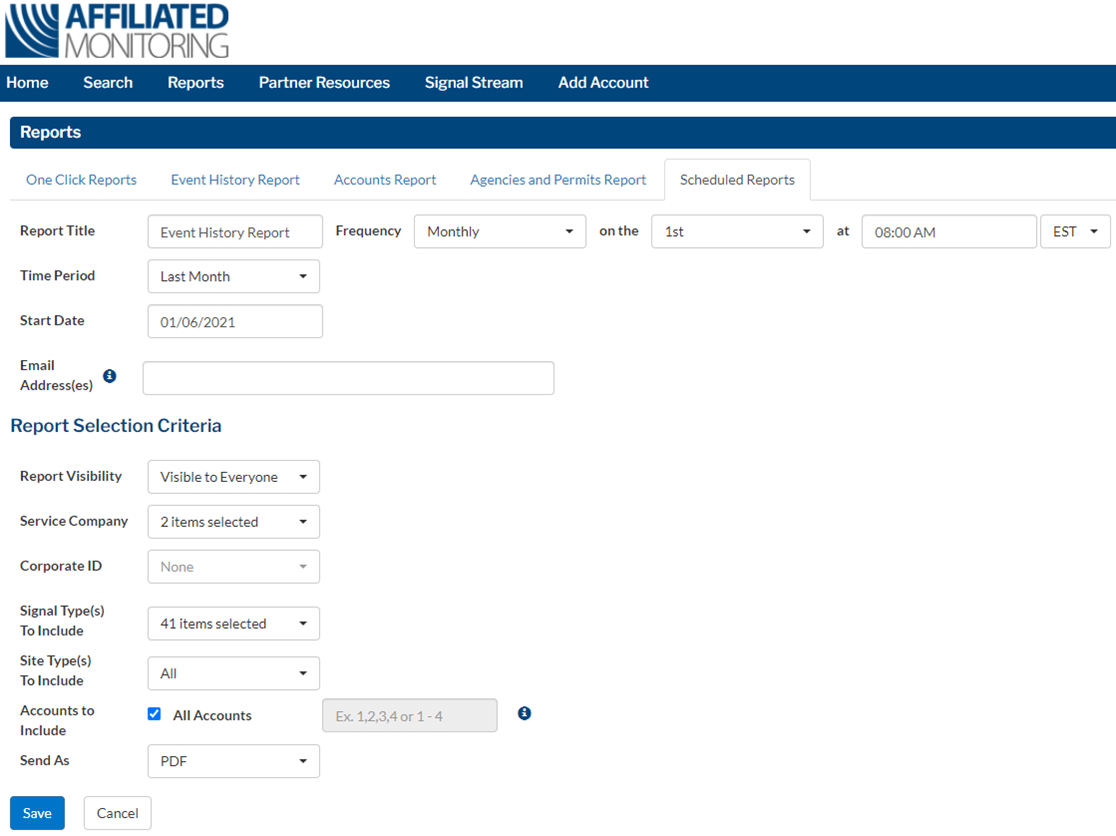
From here you will enter in the following information:
- Report Title
The name you are giving the report you are running. By default it will show ‘Event History Report’. - Frequency
Select how often you would like the test to run, Daily, Weekly or Monthly.- Daily – If you choose Daily, identify what time you want the report to run.
- Weekly – If you choose Weekly, identify what day of the week and what time you want the report to run.
- Monthly – If you choose Monthly, identify what day of the month and what time you want the report to run.
- Time Period
The Time Period will automatically be selected based on the Frequency you’ve selected. - Start Date
Select what date you want the report to start running - Email Address
Enter the email address that is to receive this report. Separate email addresses with a semicolon if multiple recipients are desired. - Report Visibility
Choose whether you want you report Visible to Everyone, so that all users at your company can view, edit, download, and delete them, or Only Visible to Me, so that it’s private. - Service Company
If you have multiple dealer numbers associated with your Partner Portal login, you can filter by the specific Service Company. - Corporate ID
If you have a group of accounts that use a Corporate ID you can filter for those with this option. - Signal Type(s) to Include
Choose what Service Types you want the report to show. Ex. Burglary Alarm, Fire, Personal Emergency, Trouble - Site Type(s) to Include
Choose what Site Types you want the report to show. Ex. Commercial, Commercial Fire, Residential, etc. - Account to Include
You can uncheck the ‘All Accounts’ box and enter in the account numbers. If you just want to view the history for one account, enter in one account number. For a series of accounts, separate them with a comma. (Ex. 1,2,3,4) For a range, separate them with spaces and a hyphen. (Ex. 1 – 4) You may also do a combination of the two. (Ex. 1,2,3 – 6) - Send As
Select if you want the report to be sent as a PDF or Excel file.
Click Save. The report will now show up under Existing Scheduled Reports as seen in the examples below. If you have a long list of reports, you can search for a specific one by Report Name using the search field in the upper right.
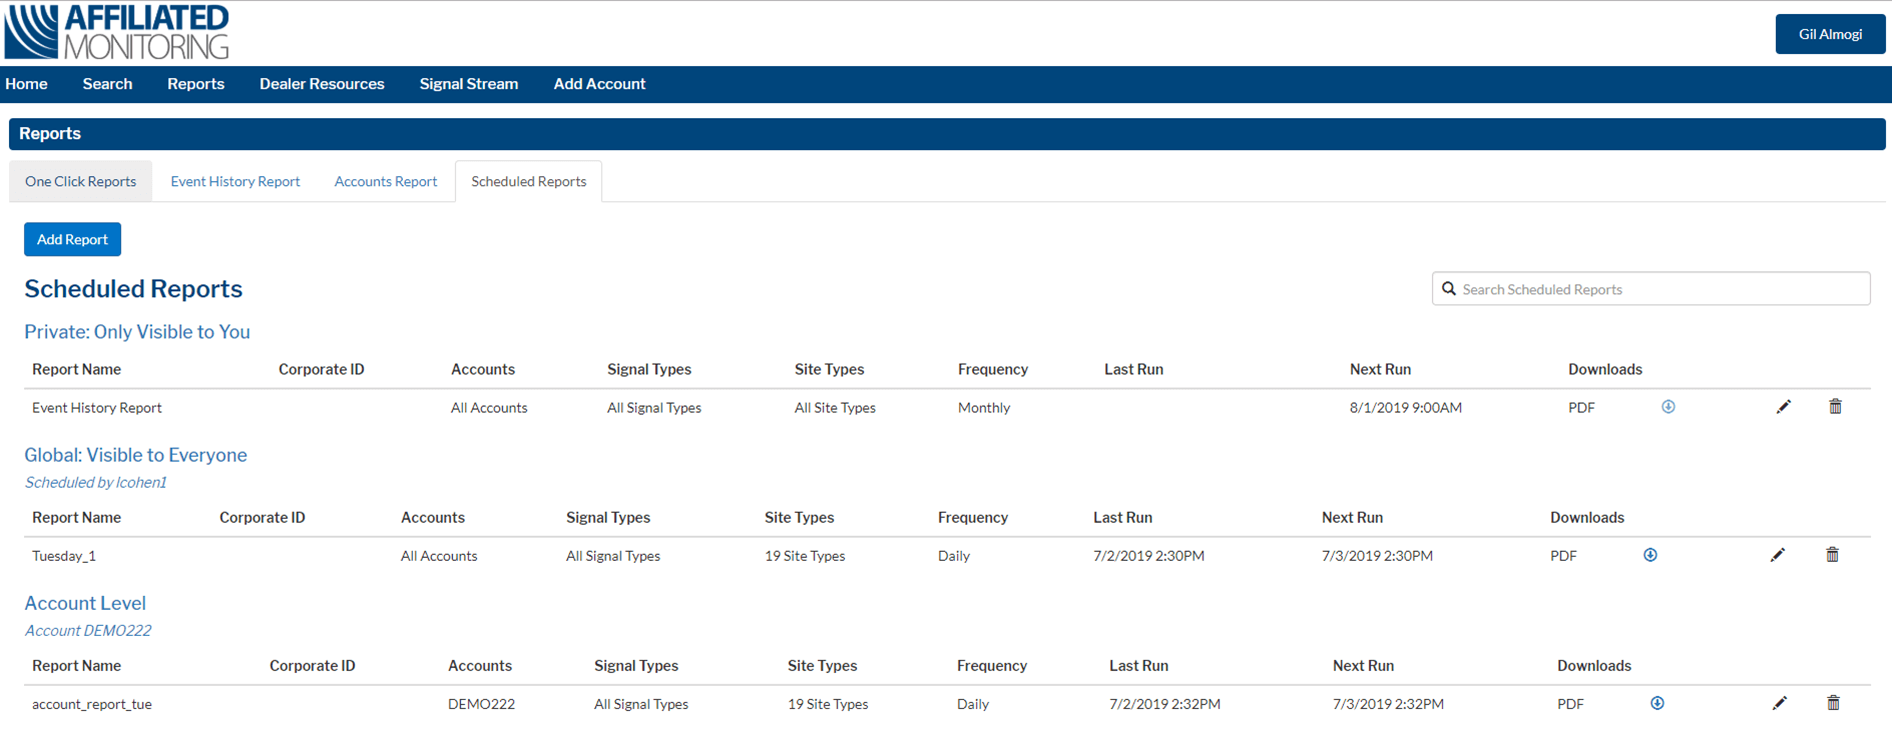
To delete a report, click the trash can to the right. To edit a report, click the pencil.